Saturday, July 18, 2015

Easy Clay Pot Project


What I love about this project is that it can be done with any size clay pot. This is a mini version for small plants or candles.  Bigger ones are more versatile.

Supplies:
2 clay pots
2 clay saucers
3 colors of Acrylic paint
E6000 clear adhesive
Sponge brush
Modge Podge

Instructions:
  1. Apply 1 coat of paint to each pot and saucer of your desired color and let dry
  2. Apply 2nd coat of paint and let dry
  3. Apply 1 coat of Modge Podge and let dry
  4. Apply 2nd coat and let dry
  5. If you feel a 3rd coat is needed, do it and let dry
  6. Glue each piece as shown in picture above


Sunday, July 5, 2015

Blogging Introvert

I am an introvert so it doesn't make since to create a blog being a person who lacks what it takes to post everyday.  Everyone has an opinion on how to write the best blogs to get the traffic.  Having a focus for your blog rather than blogging about anything.

Introverts over think and that is what I've been doing. I changed my blog theme twice, which you're not suppose to do.  Pick one and stay with it. I'm sticking with this one.


Networking and self-promotion for introverts is not easy.  It takes more effort to get out of our comfort zones.  We have dreams and desires to be successful, but we face challenges, and can be our own brick wall.

Research can drain me of energy.  I find myself wanting to binge on Netflix after doing heavy research online.

I'm writing a book, but I haven't worked on it since earlier this year.  I have to put my mind in a certain mode to type.  I thought about writing the book on here as a blog, but that would be providing it for free and I would like to sell it as an E book.


Suspense in the making.


Sunday, June 7, 2015

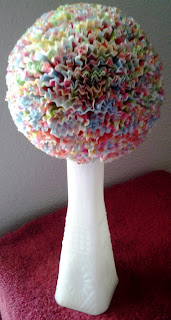
Cupcake Liner Balls

I have too many of these liners to use up because I got a little obsessed.  Here are two I worked on that didn't turn out too bad.


Supplies for the Birthday Ball:
Cupcake liners -100 pieces to be safe
Styrofoam ball - 3 inches in diameter
Hot glue gun
Hot glue sticks

Supplies for the Fall Ball:

Small cupcake liners
  50 pieces of orange
  50 pieces of yellow
  50 pieces of brown
Styrofoam ball - 3 inches in diameter
Hot glue gun
Hot glue sticks


Instructions:
  1. Fold cupcake liner in half
  2. Fold it in half again
  3. Fold the bottom of the liner to form a flat surface to glue to the ball
  4. Add glue to the flat surface then glue the cone to the styrofoam
  5. Repeat the steps above until the entire ball is covered making sure the lengths are even or you'll have a lump ball
You can leave an opening as I did on the Birthday Ball to set it on top of a vase.


Here is the fall ball.


I am bad about taking pictures as I'm working.  I will try to on my next project.

Sunday, May 24, 2015

Rolled Magazine Craft

Last year I did an image search on the internet and found projects using magazines.  I found one project that was easy and almost free.


I advertised on our company classified ads asking for magazines people didn't want anymore.  Two people replied and I got a bunch.  I also saved several different sized cans needed for this project.

Making them is easy and takes little time to roll.  You can make several while watching TV to stock up for a later time

Supplies:
glue stick
pencil or plastic straw
magazine page


Instructions:
  1. Using the pencil or plastic drinking straw, start in one corner and roll diagonally gluing as you go along.
  2. About half way, pull out the item you're using to roll the page.
  3. Keep in mind that the rolls could go crooked so watch carefully as you roll to keep both sides even.
The diagonal roll gives you more design.  You can also do a straight roll with with any size page or solid paper.

Here are two pictures of my finished projects.


You can also use calendars, books, and catalogs. Scrapbook paper would be a great way to stick to a color scheme.

If you've never done this before, give it a try and let me know how it turned out.

Friday, May 22, 2015

My First Cupcake Liner Project

I have been fascinated by all the craft projects using cupcake liners, but have found few I would want to do and display.

This project was an idea that came to me so I went for it.


Supplies:
2 or 3 different patterned cupcake liners
Styrofoam ball
Hot glue gun
Hot glue sticks
Knife                             
Scissors


Instructions:
  1. Cut the Styrofoam ball in half
  2. Fold cupcake liner in half
  3. Starting at one end, roll the cupcake liner into a cone shape
  4. Glue the end closed to secure
  5. If you want the cone shorter, cut the bottom part to desired length, but first put a dot of glue above where you plan to cut
  6. Glue the cone to the styrofoam
  7. Glue each one close together
  8. Glue a full row around the Styrofoam
    Repeat the steps above for the next row in a different pattern. The second row should lay between two cones of the first row.


      When done, glue the back of the Styrofoam to a flat surface you wish to decorate.

      I'm not completely happy with how it turned out so I didn't glue it to any surface.

      Saturday, May 2, 2015

      I am so new to blogging that I'm having a hard time figuring it out. I may be over thinking, but I want to get it right.

      I'm sure many bloggers out there have had issues getting started.  I don't know yet where this is going, but I'm going to enjoy the journey to get there.